YOLOv1 vs YOLOv3

特性 YOLOv1 YOLOv3
基础网络 GoogLeNet(Inception v1) Darknet-53(基于ResNet)
多尺度预测 无(只将原图划分为7x7的网格) 支持多尺度预测(13x13, 26x26, 52x52,这些数字是不同特征图的尺寸)
锚框 使用锚框进行预测
损失函数 简单的均方误差MSE 改进的损失函数(MSE –> 交叉熵),增加了类别和置信度的加权
检测精度 较低,尤其对小物体检测较差 提高了精度,尤其对小物体检测能力增强。
13 x 13 层负责检测大型物体,52 x 52 层检测较小的物体,26 x 26 层检测中型物体。
速度 非常快,适合实时检测 较快,但相比YOLOv1稍慢
分类能力 适合少量类别(例如20个类别) 支持多类别(例如COCO的80类)
定位精度 定位精度较差,特别是小物体 定位精度提高,能更好地处理各种物体尺寸。
模型大小 相对较小,适合资源有限的设备 相对较大,精度和速度有所提升

YOLOv1直接回归预测box,YOLOv3回归的是相对于anchor的偏移量,在anchor上施加上预测偏移量,才是模型真正的预测box。

一、网络结构

1736324488423

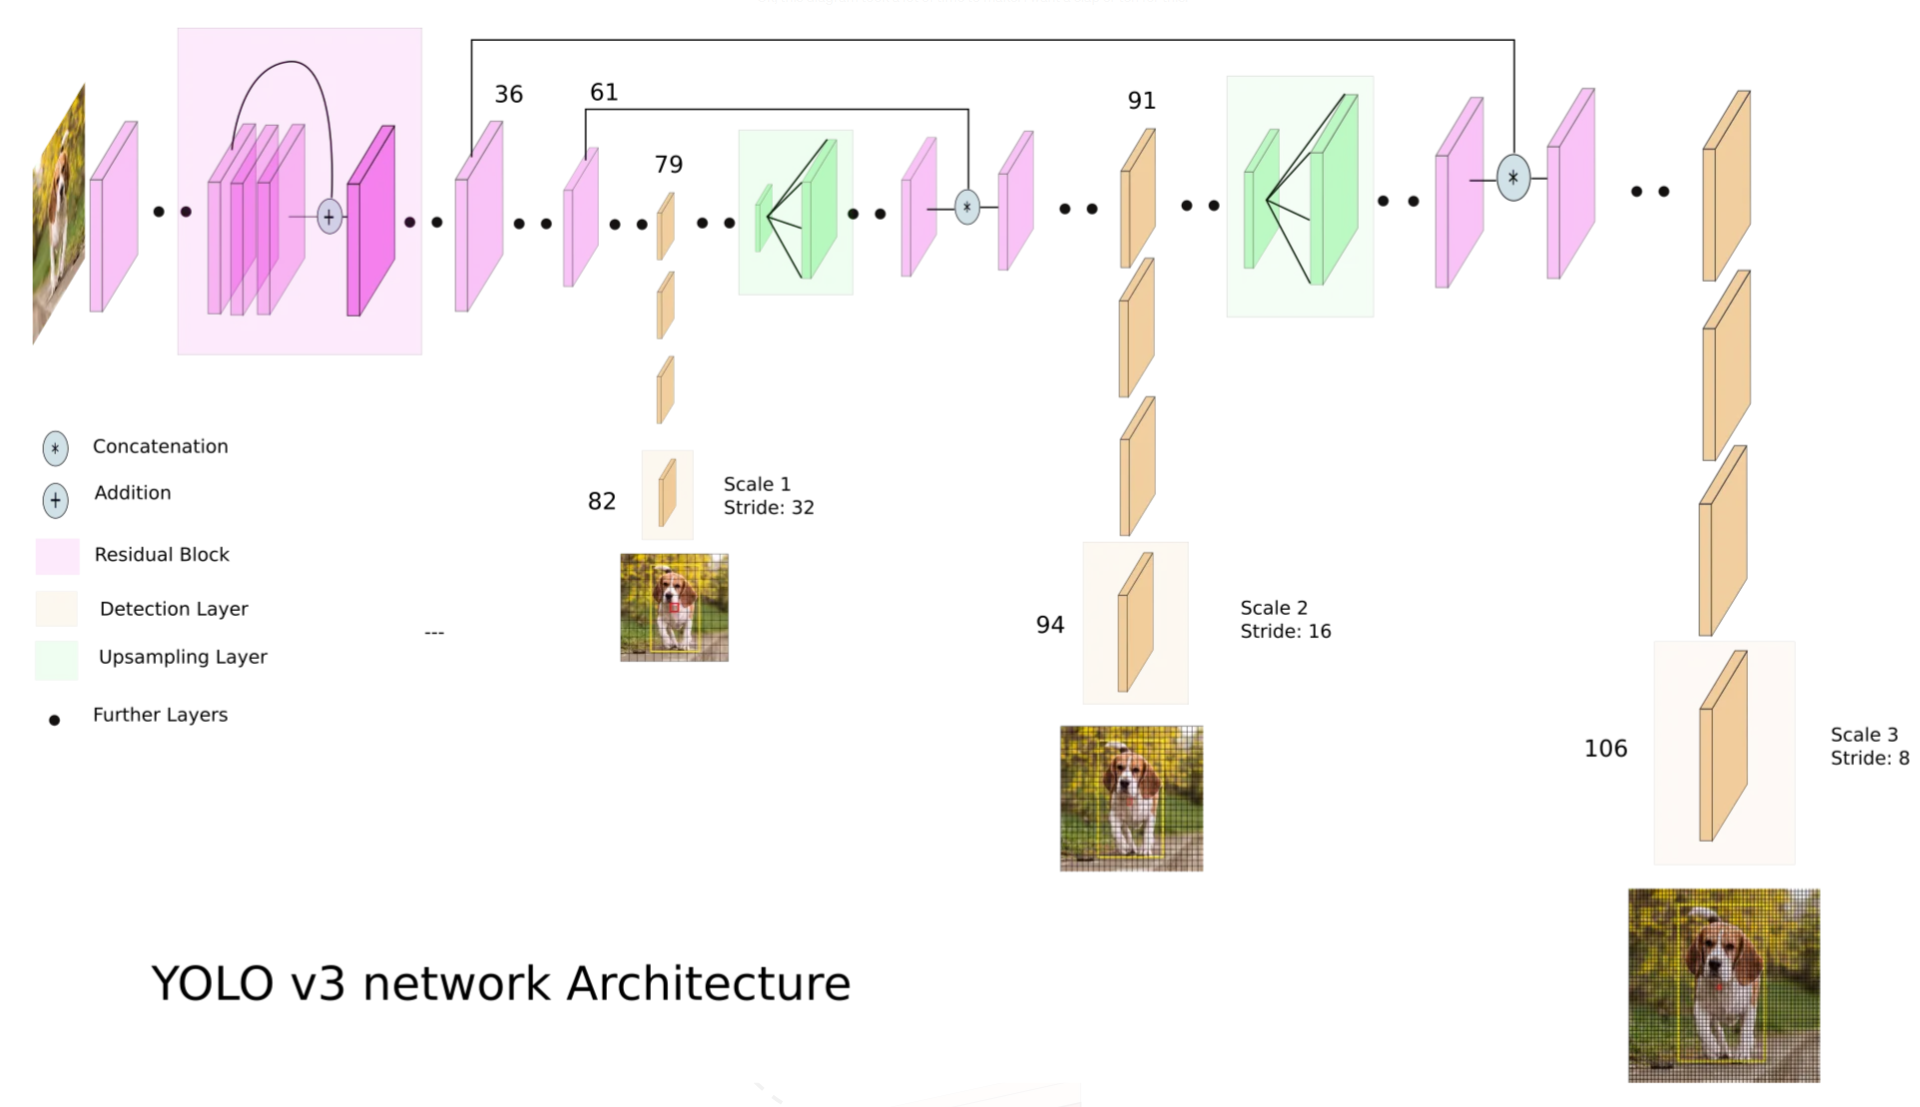
YOLOv3的网络结构如上图所示,提取出相应的网络结构配置文件config。

其中:

  • 元组对应的是卷积层的(out_channels,kernel_size,stride)
  • 列表的第一个元素B代表ResidualBlock,第二个元素代表该ResidualBlock重复的次数
  • “S”代表ScalePrediction层,总共有3个,对应3种不同尺度特征图,每个ScalePrediction层的输出是SxS(在论文中,S分别为13,26,52)的特征图,可视为SxS的网格,每个网格负责预测B=3个不同的anchor,每个anchor对应num_classes + 5(类别分布+置信度+xywh)
  • “U”代表上采样层,如图中绿色框所示,用于将特征图上采样后与前面层的特征图进行拼接融合
1
2
3
4
5
6
7
8
9
10
11
12
13
14
15
16
17
18
19
20
21
22
23
24
25
26
27
config = [
# Tuple: (out_channels,kernel_size,stride)
(32, 3, 1),
(64, 3, 2),
["B", 1],
(128, 3, 2),
["B", 2],
(256, 3, 2),
["B", 8],
(512, 3, 2),
["B", 8],
(1024, 3, 2),
["B", 4], # To this point is Darknet-53
(512, 1, 1),
(1024, 3, 1),
"S",
(256, 1, 1),
"U",
(256, 1, 1),
(512, 3, 1),
"S",
(128, 1, 1),
"U",
(128, 1, 1),
(256, 3, 1),
"S",
]

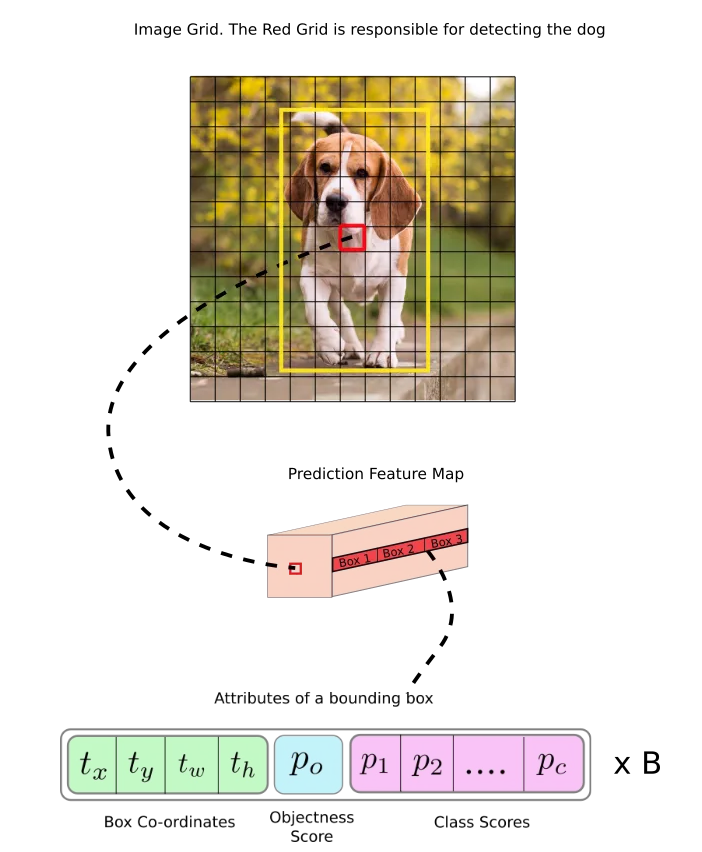
下面这张图展示了在13x13尺度特征图上,负责预测dog的grid cell的预测输出格式,包括B个bbox的信息,其中每个信息的维度是4+1+C(xywh+confidene+classes).

1736326243804

现在来代码实现YOLOv3的网络结构:

1
2
3
4
5
6
7
8
9
10
11
12
13
14
15
16
17
18
19
20
21
22
23
24
25
26
27
28
29
30
31
32
33
34
35
36
37
38
39
40
41
42
43
44
45
46
47
48
49
50
51
52
53
54
55
56
57
58
59
60
61
62
63
64
65
66
67
68
69
70
71
72
73
74
75
76
77
78
79
80
81
82
83
84
85
86
87
88
89
90
91
92
93
94
95
96
97
98
99
100
101
102
103
104
105
106
107
108
109
110
111
112
113
114
115
116
117
118
119
120
121
122
123
124
125
126
127
128
129
130
131
132
133
134
135
136
137
138
139
140
141
142
143
144
145
146
147
148
149
150
151
152
153
154
155
156
157
158
159
160
161
162
163
164
165
166
167
168
169
170
171
172
173
174
175
176
177
178
179
180
181
182
183
184

"""
Implementation of YOLOv3 architecture
"""

import torch
import torch.nn as nn

"""
Information about architecture config:
Tuple is structured by (filters, kernel_size, stride)
Every conv is a same convolution.
List is structured by "B" indicating a residual block followed by the number of repeats
"S" is for scale prediction block and computing the yolo loss
"U" is for upsampling the feature map and concatenating with a previous layer
"""
config = [
# Tuple: (out_channels,kernel_size,stride)
(32, 3, 1),
(64, 3, 2),
["B", 1],
(128, 3, 2),
["B", 2],
(256, 3, 2),
["B", 8],
(512, 3, 2),
["B", 8],
(1024, 3, 2),
["B", 4], # To this point is Darknet-53
(512, 1, 1),
(1024, 3, 1),
"S",
(256, 1, 1),
"U",
(256, 1, 1),
(512, 3, 1),
"S",
(128, 1, 1),
"U",
(128, 1, 1),
(256, 3, 1),
"S",
]


class CNNBlock(nn.Module):
def __init__(self, in_channels, out_channels, bn_act=True, **kwargs):
# kwargs: kernel_size,padding.stride,etc.
super().__init__()
self.conv = nn.Conv2d(in_channels, out_channels, bias=not bn_act, **kwargs)
self.bn = nn.BatchNorm2d(out_channels)
self.leaky = nn.LeakyReLU(0.1)
self.use_bn_act = bn_act

def forward(self, x):
if self.use_bn_act:
return self.leaky(self.bn(self.conv(x)))
else:# 构建Scale层时不使用bn,走else分支,因为Scale层的输出用于loss计算(Scale即多尺度预测层)
return self.conv(x)

# 经过ResidualBlock,输入输出shape不变
class ResidualBlock(nn.Module):
def __init__(self, channels, use_residual=True, num_repeats=1):
super().__init__()
self.layers = nn.ModuleList()
for repeat in range(num_repeats):
self.layers += [
nn.Sequential(
CNNBlock(channels, channels // 2, kernel_size=1),
CNNBlock(channels // 2, channels, kernel_size=3, padding=1),
)
]

self.use_residual = use_residual
self.num_repeats = num_repeats

def forward(self, x):
for layer in self.layers:
if self.use_residual:
x = x + layer(x)
else:
x = layer(x)

return x

# 多尺度预测的输出层
class ScalePrediction(nn.Module):
def __init__(self, in_channels, num_classes):
super().__init__()
self.pred = nn.Sequential(
CNNBlock(in_channels, 2 * in_channels, kernel_size=3, padding=1),
CNNBlock(# 每个scale层的输出是sxs的特征图,可视为sxs的网格,每个网格负责预测3个anchor,
#每个anchor对应num_classes + 5(类别分布+置信度+xywh)
2 * in_channels, (num_classes + 5) * 3, bn_act=False, kernel_size=1
),
)
self.num_classes = num_classes

def forward(self, x):
return (
self.pred(x)
.reshape(x.shape[0], 3, self.num_classes + 5, x.shape[2], x.shape[3])
.permute(0, 1, 3, 4, 2)
)
# BSx3x13x13x(5+num_classes)
# BSx3x26x26x(5+num_classes)
# BSx3x52x52x(5+num_classes)


class YOLOv3(nn.Module):
def __init__(self, in_channels=3, num_classes=80):
super().__init__()
self.num_classes = num_classes
self.in_channels = in_channels
self.layers = self._create_conv_layers()

def forward(self, x):
outputs = [] # for each scale
route_connections = []
for layer in self.layers:
if isinstance(layer, ScalePrediction):
outputs.append(layer(x))
continue

x = layer(x)

if isinstance(layer, ResidualBlock) and layer.num_repeats == 8:
route_connections.append(x)

# 不同尺度特征图拼接融合
elif isinstance(layer, nn.Upsample):
x = torch.cat([x, route_connections[-1]], dim=1)
route_connections.pop()

return outputs

def _create_conv_layers(self):
layers = nn.ModuleList()
in_channels = self.in_channels

for module in config:
if isinstance(module, tuple):
out_channels, kernel_size, stride = module
layers.append(
CNNBlock(
in_channels,
out_channels,
kernel_size=kernel_size,
stride=stride,
padding=1 if kernel_size == 3 else 0,
)
)
in_channels = out_channels

elif isinstance(module, list):
num_repeats = module[1]
layers.append(ResidualBlock(in_channels, num_repeats=num_repeats,))

elif isinstance(module, str):
if module == "S":
layers += [
ResidualBlock(in_channels, use_residual=False, num_repeats=1),
CNNBlock(in_channels, in_channels // 2, kernel_size=1),
ScalePrediction(in_channels // 2, num_classes=self.num_classes),
]
in_channels = in_channels // 2

elif module == "U":
layers.append(nn.Upsample(scale_factor=2),)
in_channels = in_channels * 3

return layers


if __name__ == "__main__":
num_classes = 20
IMAGE_SIZE = 416
model = YOLOv3(num_classes=num_classes)
x = torch.randn((2, 3, IMAGE_SIZE, IMAGE_SIZE))
out = model(x)
assert model(x)[0].shape == (2, 3, IMAGE_SIZE//32, IMAGE_SIZE//32, num_classes + 5)# 13x13
assert model(x)[1].shape == (2, 3, IMAGE_SIZE//16, IMAGE_SIZE//16, num_classes + 5)# 26x26
assert model(x)[2].shape == (2, 3, IMAGE_SIZE//8, IMAGE_SIZE//8, num_classes + 5)# 52x52
print("Success!")

二、数据加载器

打开一个标注文件:

1735969747145

YOLOv3总共有3个输出层用于loss计算,这些输出层被称为Scale Predicton(这里简记为scale,便于书写),每个scale都是输入图片下采样得到的,尺寸分别为13X13,26X26,52X52。

每个scale都可以视为将原图划分为了SxS(S=13,26,52)大小的网格,每个网格预设3个anchor,每个anchor包含6个元素:置信度(0 or1),xywh,目标类别。

为了计算loss,在加载数据时,和YOLOv1一样,需要使用标注文件中的box信息,制作一个和模型预测结果shape基本一致的”框架”,如下:

1
targets = [torch.zeros((self.num_anchors // 3, S, S, 6)) for S in self.S]

以上代码仅做了初始化,接下来需要使用标注文件中的box信息对targets进行填充。

具体来说,针对一个标注txt文件中的每一条box信息:

  • 首先计算当前标注box与3个scale上3个anchor的IoU,总共9个anchor,相应可得到9个IoU值,并从大到小排序(优先匹配IoU高的anchor)。这里,由于标注box和anchor都是归一化的,因此可以直接计算IoU。
  • 然后,遍历所有的9个anchor,分别确定每个anchor所属的scale,以及当前标注box在这个scale中的行列位置信息i,j,并将相对于原图的标注box信息转换到相对网格的(此时称该网格负责预测当前box,其实就是算一下当前box在scale中的行和列,这个scale是可以看作被划分为SxS的网格的,因此行和列其实就是网格上的位置坐标,比如scale对应的特征图是下采样了20倍的,那么一个网格就对应原图中的20个像素。虽然一个scale上有SxS个网格,但是只有这个网格与标注box比较接近,即两者IoU最大,因此,这个scale上除了该匹配网格之外,其它网格是没有与之匹配的标注box的,因此就不用填充了)。

注意,针对每个标注box,在每个scale上都会有一个anchor与之匹配,因此使用了 has_anchor = [False] * 3来确保每个scale上的anchor都已与之匹配。

在上述对某个标注box进行匹配时,可以将所有的anchor划分为3类:

  • 正样本
  • 负样本
  • 忽略样本

具体来说,对于每一个标注bbox,在3个scale中,每个scale下都有1个anchor与之匹配,这就是正样本。此外,每个scale中还有剩余的2个anchor,如果这两个anchor与标注bbox的IoU都比较小,那么就是负样本。但是,如果剩余的某个anchor与标注box的IoU也比较大,此时按理来说它应该是正样本,但是当前标注box已经与另一个anchor匹配了,并且与另一个anchor的IoU更大,因此即使当前anchor与标注box的IOU也有点大,但已经没有可以与之匹配的标注box了,因此需要忽略当前的anchor(confidence设置为-1做个标记),不参与loss计算。

1
2
3
4
5
6
7
8
9
10
11
12
13
14
15
16
17
18
19
20
21
22
23
24
25
26
27
28
29
30
31
32
33
34
35
36
37
38
39
40
41
42
43
44
45
46
47
48
49
50
51
52
53
54
55
56
57
58
59
60
61
62
63
64
65
66
67
68
69
70
71
72
73
74
75
76
77
78
79
80
81
82
83
84
85
86
87
88
89
90
91
92
93
94
95
96
97
98
99
100
101
102
103
104
105
106
107
108
109
110
111
112
113
114
115
116
117
118
119
120
121
122
123
124
125
126
127
128
129
130
131
132
133
134
135
136
137
138
139
140
141
142
143
144
145
146
147
148
149
150
"""
Creates a Pytorch dataset to load the Pascal VOC & MS COCO datasets
"""

import config
import numpy as np
import os
import pandas as pd
import torch

from PIL import Image, ImageFile
from torch.utils.data import Dataset, DataLoader
from utils import (
cells_to_bboxes,
iou_width_height as iou,
non_max_suppression as nms,
plot_image
)

ImageFile.LOAD_TRUNCATED_IMAGES = True

class YOLODataset(Dataset):
def __init__(
self,
csv_file,
img_dir,
label_dir,
anchors,
# anchors = [
# [(0.28, 0.22), (0.38, 0.48), (0.9, 0.78)],# 13x13对应的特征图尺度上预设的3个anchor(已归一化),每个网格都有3个anchor
# [(0.07, 0.15), (0.15, 0.11), (0.14, 0.29)],# 26x26对应的特征图尺度上预设的3个anchor(已归一化),每个网格都有3个anchor
# [(0.02, 0.03), (0.04, 0.07), (0.08, 0.06)],# 52x52对应的特征图尺度上预设的3个anchor(已归一化),每个网格都有3个anchor
# ] # Note these have been rescaled to be between [0, 1]

image_size=416,
S=[13, 26, 52],
C=20,
transform=None,
):
self.annotations = pd.read_csv(csv_file)
self.img_dir = img_dir
self.label_dir = label_dir
self.image_size = image_size
self.transform = transform
self.S = S
self.anchors = torch.tensor(anchors[0] + anchors[1] + anchors[2]) # for all 3 scales,总共3x3=9个anchor
self.num_anchors = self.anchors.shape[0]
self.num_anchors_per_scale = self.num_anchors // 3# 9//3=3
self.C = C
self.ignore_iou_thresh = 0.5

def __len__(self):
return len(self.annotations)

def __getitem__(self, index):
label_path = os.path.join(self.label_dir, self.annotations.iloc[index, 1])
bboxes = np.roll(np.loadtxt(fname=label_path, delimiter=" ", ndmin=2), 4, axis=1).tolist()# cls,xywh-->xywh,cls for albumentations数据增强
img_path = os.path.join(self.img_dir, self.annotations.iloc[index, 0])
image = np.array(Image.open(img_path).convert("RGB"))

if self.transform:
augmentations = self.transform(image=image, bboxes=bboxes)
image = augmentations["image"]
bboxes = augmentations["bboxes"]

# Below assumes 3 scale predictions (as paper) and same num of anchors per scale
# 每张图片有3个尺度的预测特征图,大小是SxS(S=13,26,52)的网格,每个网格预测self.num_anchors // 3=3个anchor,
# 每个anchor包含6个元素:confidence+xywh+cls=1+4+1=6,最后的1是真实类别,后续计算loss时直接用nn.CrossEntropyLoss(GT_label, Pred_label_distribution)
targets = [torch.zeros((self.num_anchors // 3, S, S, 6)) for S in self.S]# 6=confidence+xywh+cls
for box in bboxes:
# 计算每一个anchor与标注box的IoU
# self.anchors(shape是9x2)是归一化的,可以直接与标注的box(做数据集时也归一化了)算IoU,
# 因为归一化后,相对坐标都是左上角=(0,0),这样就可以一次性直接计算3个scale下各自对应的3个anchor与标注bbox的IoU了
iou_anchors = iou(torch.tensor(box[2:4]), self.anchors)
anchor_indices = iou_anchors.argsort(descending=True, dim=0)# 按照IoU从大到小排序
x, y, width, height, class_label = box# 获取标注box的信息
has_anchor = [False] * 3 # 当前标注box在每一个 scale 都应该有一个 匹配的anchor
for anchor_idx in anchor_indices:# 遍历每一个anchor
scale_idx = anchor_idx // self.num_anchors_per_scale# 0,1,2
anchor_on_scale = anchor_idx % self.num_anchors_per_scale# 0,1,2
S = self.S[scale_idx]
i, j = int(S * y), int(S * x) # which cell

# 当前anchor在targets中对应的,标记当前anchor是否已经被当前的标注box匹配
anchor_taken = targets[scale_idx][anchor_on_scale, i, j, 0]

if not anchor_taken and not has_anchor[scale_idx]:
targets[scale_idx][anchor_on_scale, i, j, 0] = 1
# 将相对于原图的标注box信息转换到相对于grid cell的
x_cell, y_cell = S * x - j, S * y - i # both between [0,1]
width_cell, height_cell = (
width * S,
height * S,
) # can be greater than 1 since it's relative to cell
box_coordinates = torch.tensor(
[x_cell, y_cell, width_cell, height_cell]
)
targets[scale_idx][anchor_on_scale, i, j, 1:5] = box_coordinates
targets[scale_idx][anchor_on_scale, i, j, 5] = int(class_label)
has_anchor[scale_idx] = True

# 对于每一个标注bbox,3个scale中都有1个scale的1个anchor与之匹配,
# 因此每个scale中还有剩余的2个anchor,如果这两个anchor与标注bbox的IoU都比较小,那么就是负样本
# 但是,如果剩余的某个anchor与标注box的IoU也比较大,此时按理来说它应该是正样本,
# 但是当前标注box已经与另一个anchor匹配了,并且与另一个anchor的IoU更大,
# 因此即使当前anchor与标注box的IOU也有点大,但已经没有可以与之匹配的标注box了
# 因此需要忽略当前的anchor(confidence设置为-1做个标记),不参与loss计算
elif not anchor_taken and iou_anchors[anchor_idx] > self.ignore_iou_thresh:
targets[scale_idx][anchor_on_scale, i, j, 0] = -1 # ignore prediction

return image, tuple(targets)


def test():
anchors = config.ANCHORS

transform = config.test_transforms

dataset = YOLODataset(
r"D:\MyFile\github\Machine-Learning-Collection-master\ML\Pytorch\object_detection\data\8examples.csv",
r"D:\MyFile\github\Machine-Learning-Collection-master\ML\Pytorch\object_detection\data\images",
r"D:\MyFile\github\Machine-Learning-Collection-master\ML\Pytorch\object_detection\data\labels",
S=[13, 26, 52],
anchors=anchors,
transform=transform,
)
S = [13, 26, 52]
scaled_anchors = torch.tensor(anchors) / (
1 / torch.tensor(S).unsqueeze(1).unsqueeze(1).repeat(1, 3, 2)
)
loader = DataLoader(dataset=dataset, batch_size=1, shuffle=True)
for x, y in loader:
boxes = []

for i in range(y[0].shape[1]):
anchor = scaled_anchors[i]
print(anchor.shape)
print(y[i].shape)
boxes += cells_to_bboxes(
y[i], is_preds=False, S=y[i].shape[2], anchors=anchor
)[0]
boxes = nms(boxes, iou_threshold=1, threshold=0.7, box_format="midpoint")
print(boxes)
plot_image(x[0].permute(1, 2, 0).to("cpu"), boxes)


if __name__ == "__main__":

test()

三、损失函数

每一个scale都会单独计算一个loss。

loss计算公式和v1的组成类似(都是置信度(OBJ,noOBJ)+坐标+分类3部分损失),v3的分类损失用的交叉熵而不是MSE)。但是,在计算边界框坐标损失的时候,v1是直接预测box的xywh,而v3预测的是xywh的偏移量,然后将这些偏移量施加到预设的anchor上进行变换,得到最终的预测box。

变换公式如下:

1741944125108

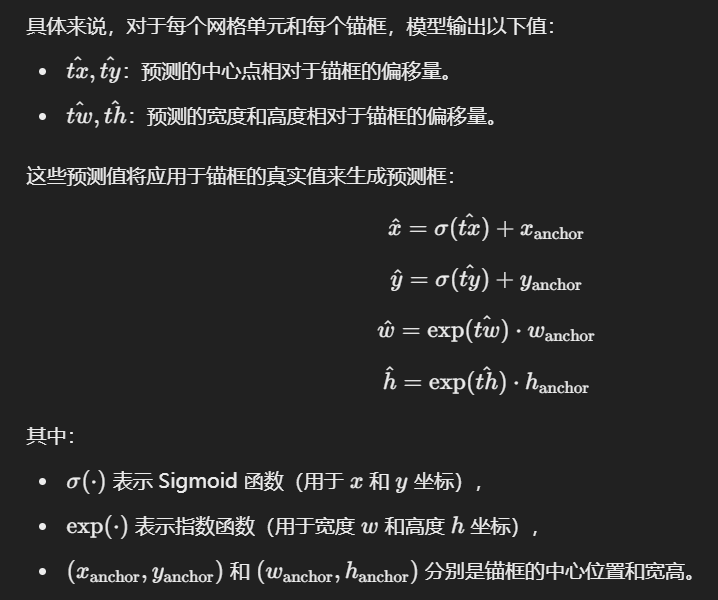
target中的xy已经是相对于anchor的了(详见YOLODataset类,且3个anchor的中心点xy是一样的),因此在loss计算代码中,只需要将预测的xy偏移量进行sigmoid变换,而不需要再加上anchor的中心点坐标。

1
2
3
4
5
6
7
8
9
10
11
12
13
14
15
16
17
18
19
20
21
22
23
24
25
26
27
28
29
30
31
32
33
34
35
36
37
38
39
40
41
42
43
44
45
46
47
48
49
50
51
52
53
54
55
56
57
58
59
60
61
62
63
64
65
66
67
68
69
70
class YoloLoss(nn.Module):
def __init__(self):
super().__init__()
self.mse = nn.MSELoss()
self.bce = nn.BCEWithLogitsLoss()
self.entropy = nn.CrossEntropyLoss()
self.sigmoid = nn.Sigmoid()

# Constants signifying how much to pay for each respective part of the loss
self.lambda_class = 1
self.lambda_noobj = 10
self.lambda_obj = 1
self.lambda_box = 10

def forward(self, predictions, target, anchors):
# predictions:[2,3,S,S,25],S = 13, 26, 52
# target:[2,3,S,S,6]
# anchors:[3,2] 每一个scale下的每一个网格都有3个预设anchor(wh)

# Check where obj and noobj (we ignore if target == -1)
# 显式地忽略掉ignore的targets
obj = target[..., 0] == 1 # [2, 3, S, S], in paper this is Iobj_i
noobj = target[..., 0] == 0# [2, 3, S, S], in paper this is Inoobj_i

# ======================= #
# FOR NO OBJECT LOSS #
# ======================= #

no_object_loss = self.bce(
(predictions[..., 0:1][noobj]), (target[..., 0:1][noobj]),
)

# ==================== #
# FOR OBJECT LOSS #
# ==================== #

anchors = anchors.reshape(1, 3, 1, 1, 2)# 每一个scale的anchor:3x2-->1x3x1x1x2
# 模型预测的是xywh相对于anchor的偏移量,这样可以在anchor上进行微调得到预测box,而不是模型直接输出预测box,更容易收敛
# 因此需要将预测结果predictions中的预测偏移量施加到anchor上,作为真正的预测box
box_preds = torch.cat([self.sigmoid(predictions[..., 1:3]), torch.exp(predictions[..., 3:5]) * anchors], dim=-1)# [2, 3, S, S, 4]
ious = intersection_over_union(box_preds[obj], target[..., 1:5][obj]).detach()# [8,1] 8是obj框的数量,在每一个batch里都不一样
object_loss = self.mse(self.sigmoid(predictions[..., 0:1][obj]), ious * target[..., 0:1][obj])
print((self.sigmoid(predictions[..., 0:1][obj])).shape, ious.shape, (target[..., 0:1][obj]).shape)# all [8,1]

# ======================== #
# FOR BOX COORDINATES #
# ======================== #

# 将"预测的xy偏移量"变换到"预测的xy"
predictions[..., 1:3] = self.sigmoid(predictions[..., 1:3]) # x,y coordinates
# 将target的wh缩放到偏移量的量纲,因为预测的wh是偏移量
target[..., 3:5] = torch.log(
(1e-16 + target[..., 3:5] / anchors)#
) # width, height coordinates
box_loss = self.mse(predictions[..., 1:5][obj], target[..., 1:5][obj])

# ================== #
# FOR CLASS LOSS #
# ================== #

class_loss = self.entropy(
(predictions[..., 5:][obj]), (target[..., 5][obj].long()),
)

return (
self.lambda_box * box_loss
+ self.lambda_obj * object_loss
+ self.lambda_noobj * no_object_loss
+ self.lambda_class * class_loss
)

四、训练

和v1类似,训练代码也是很常规的,直接贴过来:

1
2
3
4
5
6
7
8
9
10
11
12
13
14
15
16
17
18
19
20
21
22
23
24
25
26
27
28
29
30
31
32
33
34
35
36
37
38
39
40
41
42
43
44
45
46
47
48
49
50
51
52
53
54
55
56
57
58
59
60
61
62
63
64
65
66
67
68
69
70
71
72
73
74
75
76
77
78
79
80
81
82
83
def train_fn(train_loader, model, optimizer, loss_fn, scaler, scaled_anchors):
loop = tqdm(train_loader, leave=True)
losses = []
for batch_idx, (x, y) in enumerate(loop):
x = x.to(config.DEVICE)
y0, y1, y2 = (
y[0].to(config.DEVICE),
y[1].to(config.DEVICE),
y[2].to(config.DEVICE),
)# y_*: BS x 3 x S x S x 6

with torch.cuda.amp.autocast():
out = model(x)
loss = (
loss_fn(out[0], y0, scaled_anchors[0])
+ loss_fn(out[1], y1, scaled_anchors[1])
+ loss_fn(out[2], y2, scaled_anchors[2])
)

losses.append(loss.item())
optimizer.zero_grad()
scaler.scale(loss).backward()
scaler.step(optimizer)
scaler.update()

# update progress bar
mean_loss = sum(losses) / len(losses)
loop.set_postfix(loss=mean_loss)


def main():
model = YOLOv3(num_classes=config.NUM_CLASSES).to(config.DEVICE)
optimizer = optim.Adam(
model.parameters(), lr=config.LEARNING_RATE, weight_decay=config.WEIGHT_DECAY
)
loss_fn = YoloLoss()
scaler = torch.cuda.amp.GradScaler()

train_loader, test_loader, train_eval_loader = get_loaders(
train_csv_path=r"D:\MyFile\github\Machine-Learning-Collection-master\ML\Pytorch\object_detection\data\100examples.csv", test_csv_path=r"D:\MyFile\github\Machine-Learning-Collection-master\ML\Pytorch\object_detection\data\test.csv"
)

if config.LOAD_MODEL:
load_checkpoint(
config.CHECKPOINT_FILE, model, optimizer, config.LEARNING_RATE
)

scaled_anchors = (
torch.tensor(config.ANCHORS)
* torch.tensor(config.S).unsqueeze(1).unsqueeze(1).repeat(1, 3, 2)
).to(config.DEVICE)

for epoch in range(config.NUM_EPOCHS):
#plot_couple_examples(model, test_loader, 0.6, 0.5, scaled_anchors)
train_fn(train_loader, model, optimizer, loss_fn, scaler, scaled_anchors)

#if config.SAVE_MODEL:
# save_checkpoint(model, optimizer, filename=f"checkpoint.pth.tar")

#print(f"Currently epoch {epoch}")
#print("On Train Eval loader:")
#print("On Train loader:")
#check_class_accuracy(model, train_loader, threshold=config.CONF_THRESHOLD)

if epoch > 0 and epoch % 3 == 0:
check_class_accuracy(model, test_loader, threshold=config.CONF_THRESHOLD)
pred_boxes, true_boxes = get_evaluation_bboxes(
test_loader,
model,
iou_threshold=config.NMS_IOU_THRESH,
anchors=config.ANCHORS,
threshold=config.CONF_THRESHOLD,
)
mapval = mean_average_precision(
pred_boxes,
true_boxes,
iou_threshold=config.MAP_IOU_THRESH,
box_format="midpoint",
num_classes=config.NUM_CLASSES,
)
print(f"MAP: {mapval.item()}")
model.train()

以上就是本文关于YOLOv3的介绍。